At times, it’s helpful to be able to create a secure, private family blog for sharing updates with close friends and family without posting to more public social media channels.
There are any number of reasons you might do this: sharing updates about a new child, a new city, or — in our family’s case — a new adventure.
As friends may know, my wife is currently doing a bit of traveling, which leaves me in the position of (temporary) single-parent to our daughter. We knew we wanted to find a way to (privately) share updates about our experiences during her travels, but we had kind of just landed on “I guess we’ll text each other? ¯\_(ツ)_/¯ ”
Since she’s currently 6 hours ahead of me here in Ohio, we knew that text messages could be tricky, so I started writing longer-form updates about what my daughter and I were doing, trying to capture adorable quotes and photos along the way. I figured at the end of each day, I could send an email, and Kim could read it when she had time.
Private Family Blogs: Better Than Email
Of course, emails have a habit of getting disjointed, and a giant email thread isn’t the best use of our inboxes. We’re also stuck if we want to update posts as we go throughout the day, as histories get muddy really quickly.
I decided what we needed was a private, family blog: nothing on the site is public, so only Kim and I (or anyone else we grant access to) can see it. We can post media, short- or long-form content, and we can comment on each others’ posts.
If this sounds like something that would benefit you and your family, I’m documenting what I did for posterity here; best of all, it takes very little to get started.
To create a private, family blog, you’ll need:
- A WordPress instance (I’m running mine on Liquid Web/Nexcess, for [hopefully] obvious reasons)
- The “Restricted Site Access” plugin
- Jetpack (optional)
The key to this whole setup is 10up’s “Restricted Site Access” plugin. While I was at 10up, we’d use this plugin all the time to lock down staging and/or not-ready-for-Primetime sites, and it works fabulously.
Once the plugin has been installed and activated, visit the “Settings › Reading” page to configure it; I’m preventing anyone who isn’t logged in from viewing the site, and explicitly sending guest users to the login screen:
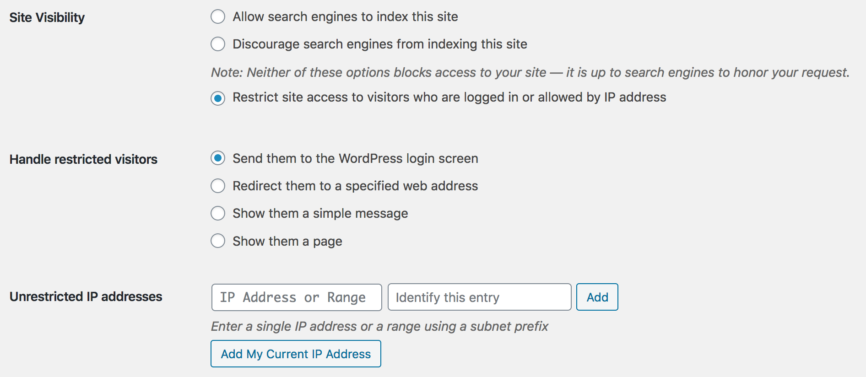
It’s important to note that I have registration disabled on the WordPress site (be sure “Settings › General › Anyone Can Register” is unchecked); if anybody could sign up, they could access my private content.
Also, it’s worth noting that Restricted Site Access is meant to lock everyone out; if you want to permit certain users to see certain posts, you might want to consider something more robust like Restrict Content Pro.
Now that Restricted Site Access is enabled and blocking anyone who isn’t logged in, we can start adding content and configuring the site. I chose to add Jetpack for it’s brute-force protection and image optimization, but you’re welcome to bring whatever tools you’d like here. A full list of my enabled plugins for my private, family blog looks like this:
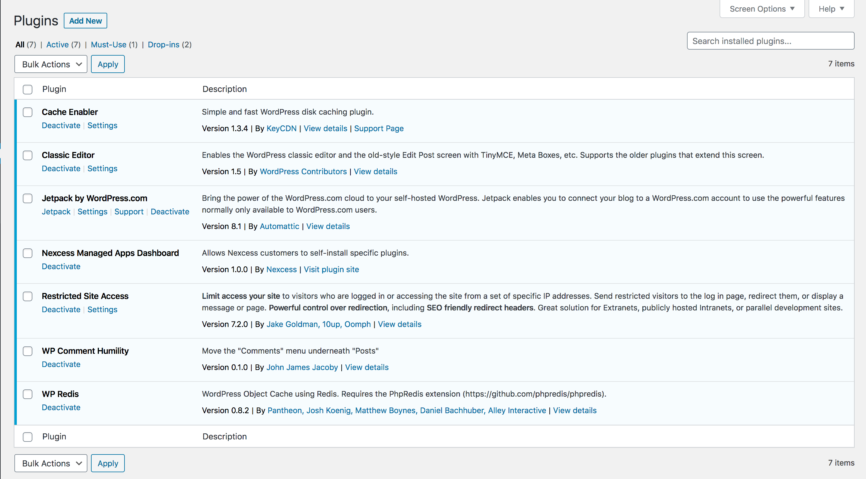
As Liquid Web and/or Nexcess customers may recognize, most of those plugins were pre-installed when I created the site; the only things I’ve added are Classic Editor, Jetpack, Restricted Site Access, and John James Jacoby’s excellent WP Comment Humility. If you’re interested in using the block editor (“Gutenberg”) and/or don’t care that comments live as a top-level menu item, you can trim this plugin list down even further.
As far as themes go, I wasn’t obsessing over finding the world’s most beautiful theme for a blog that only my wife and I will ever see. I found Twenty Nineteen, which ships with WordPress, to be perfectly fine for this quick experiment.
Next, I added my first couple of days worth of content, translating them from the Markdown files I had stored locally, and uploading images. Being able to upload media directly from my phone (via the official WordPress app and Jetpack’s connection to WordPress.com) was especially nice.
Finally, I created a new “author”-level user for Kim, letting WordPress send her a notification. Now she can both read everything on the site as well as write her own content, and we can leave comments back and forth, updating as we go. Best of all, if we find that getting a constant stream of updates is too much (it’s hard being apart), we can simply not read updates until we’re in a homesick kind of mood.
All told, setting this up took about twenty minutes. It certainly helps that Liquid Web/Nexcess streamlines the WordPress setup process (hooray for dog-fooding!), but the barrier to setting up a private, family blog that you have complete control over has never been lower!


Maeroa
Thank you for this :) With everything going on in the world my family have all decided to try a private family blog to keep everyone updated without using social media so this has been super helpful :)
Larry M. Gibson
Sounds complicated to set up; however, it is probably what I need. If I want to post geneology and personal writings, such as family history and my journey fighting cancer, what happens to all this content if I quit subscribing my host? (Or if they go out of business?).
Michelle
Unless you have backups of some sort, if the host goes away, so does your data.
Rosser
Call it a faction, call it an organization, call it a clan, call it a family: Anything you call it, whoever you will be, you want one.
Ariamag
Thank you, it was really useful for me.
Nick
Great post, Steve! Really appreciate you sharing your process.
I am beginning to create a website for my family for fun, and as a way to investigate this as a new service for my web design business.