Over the holidays, I decided to tackle a problem that’s been on the back-burner for a while: how can my wife and I automatically back up our Macs to a common Time Machine drive? We already have a router I’m happy with (the NETGEAR R6400, which is a couple years old now), so I didn’t want to replace a solid router with Apple’s Time Capsule, especially given that the line seems to have been discontinued. Is there a way to keep a common Time Machine drive on the network?
Up until this point, Kim and I have gotten by with our own Time Machine disks that live on our desks: when we’d remember, we’d plug in the disks and ensure a backup was made. I can’t speak for Kim, but I know my backup history was…spotty, to say the least.
When Kim started her own business in 2017, we upgraded her older MacBook Pro with a new SSD and kept the old drive housed where the rarely-used optical drive used to live. All told, she has just shy of a terabyte of storage on her machine, but was (just barely) backing up to a 500GB Time Machine disk. Wanting to ensure that client files and portfolio pieces alike were backed up securely, Kim asked if I could set something up to make the process easier; this is what I found:
The hardware
To start, I checked NETGEAR’s support documentation and found this article about using a Network-Attached Storage (NAS) device for Time Machine backups. “Pretty simple,” I thought, and ordered a Seagate 8TB external HDD — more than enough room for years of incremental backups for two machines.
When the drive arrived, I formatted (erased) it as “Mac OS Extended (Journaled)” using Disk Utility, giving the volume the name of “Astro” (we had recently purchased a Roomba and named it “Rosie”, so we must have been on a Jetsons kick). Next, I plugged the drive into the USB 3.0 port on the front of the router — the R6400 has USB 3 in the front and 2 in the back, and I’d rather have the higher read/write speeds — then wandered up to Kim’s office to configure her new Time Machine.
Setup was rather straight-forward: once the new drive appeared as a network disk, I clicked “Add or Remove a Backup Disk” in the Time Machine preference pane (System Preferences › Time Machine), selected the network volume, then clicked “Use Disk”.
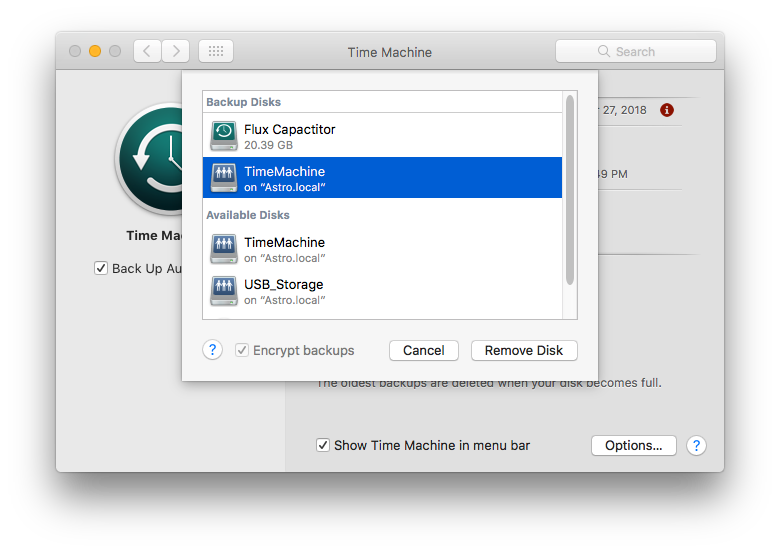
“Flux Capacitor” is the old time machine drive that lives on my desk, which can now go into storage
For our computers, I ensured that the backups were encrypted. I also changed the default network share name within my router configuration to “TimeMachine” (via Advanced › USB Functions › ReadySHARE Storage) and turned off some of the default sharing options, as I don’t want this drive (or anything else plugged into the router) to be accessible over the internet.
I should warn you: the first backup will take a long time. On our network, Kim’s initial backup (for ~500GB) took somewhere in the ballpark of 16 hours!
The result
After the initial backups on each machine (I have a considerably smaller hard drive, so things went much quicker), our machines have consistently been backing up to the Time Machine drive whenever we’re on our home network. While my experience was very NETGEAR-centric given our router, this should be pretty reproducible on any decent router that can mount an external hard disk as a network share.
It’s only been a couple of weeks, but it’s been awesome to see my computer automatically being backed up hourly — far better than sporadic, manual backups of the past. If we’re sitting in the living room (where the router + Time Machine drive live), we can occasionally hear the drive spin up as new backups are being made, but it hasn’t been distracting enough to consider swapping out for a [considerably more-expensive] SSD drive.


jay
Hi thanks for the info. I’ve been trying to set up the same thing but keep having connection issues. we have 2 mbps running mohave 10.14.2 and the netgear nighthawk x10. I can get everything to work once, then we start getting error messages the next day about not being able to connect to the drive. i can still browse to the share from the mbps and have them set to connect automatically. i’ve tried different protocols and settings but no love. glad it worked out so easily for you! :)