As I mentioned in my Exporting Reveal.js Slides to PDF Using Decktape post last week, I tend to use Reveal.js – a HTML- and JavaScript-powered presentation framework – for most of my conference talks. Having given a fair number of presentations using the framework over the last few years, I thought it might be useful for speakers who haven’t yet tried (or found their footing with) Reveal.js if I laid out my preparation workflow.
Early on, I was manually creating presentations based on the framework’s “Full Setup” instructions: clone the repo, run npm install, then start editing the index.html file. It worked well enough, but my Git history (I knew early on I wanted to be able to host my presentations on GitHub Pages) would always be cluttered with commits to the core framework.
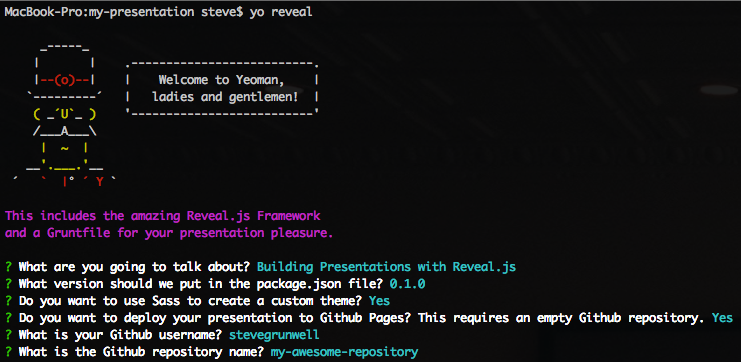
After a few presentations, I found the generator-reveal Yeoman generator from Sebastian Lara Menares, and it completely changed my approach to building presentations with Reveal.js; instead of having to manually edit the index.html file, I could instead use the generator to create new slides – as individual HTML or Markdown files – and populate slides/list.json. The generator gives me a Grunt file, allowing me to have automatic recompilation and live reloading when changes are made.
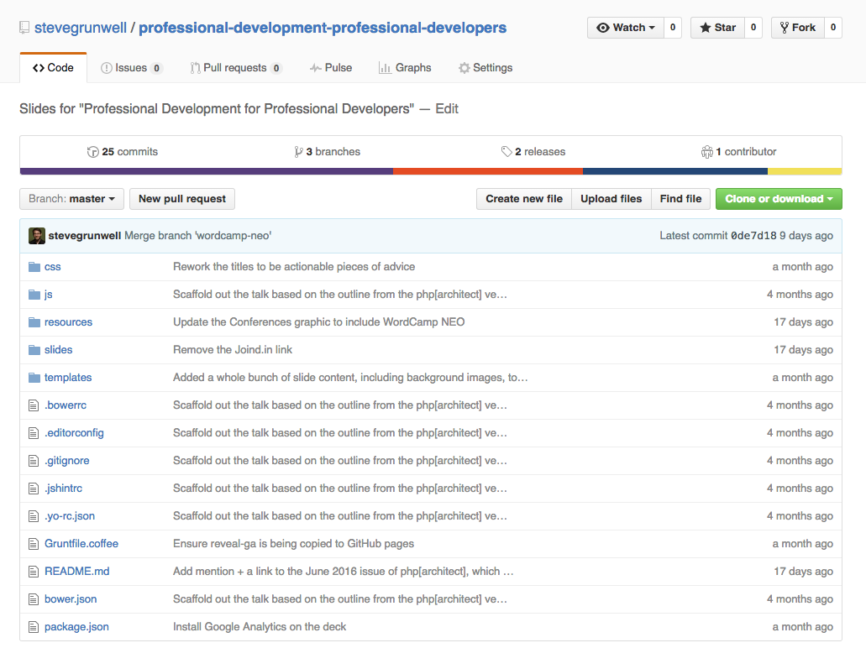
As an example, take a peak at my Professional Development for Professional Developers slide deck on GitHub:
You’ll notice that there isn’t even an index.html file in my deck, as this file is dynamically generated by Grunt. The “resources” directory contains any graphics or other media used in my presentation, while the “slides” directory contains a single markdown file for each slide in my deck, along with a list.json file that puts the slides in order (including vertical nesting).
Building your Reveal.js presentation
When I’m building my slide deck, I keep two terminal windows open: the first is just running grunt, which automatically opens and re-loads a browser tab with my slides. The second window is where I generate new slides, using the commands built into the Yeoman generator:
|
1 |
$ yo reveal:slide "This is my slide title" --markdown |
That command will automatically create the slides/this-is-my-slide-title.md Markdown file and append it to slides/list.json, then refresh my presentation. If I know I’m doing a more complicated slide where Markdown might not be a good fit, I can omit the --markdown option to generate slides/this-is-my-slide-title.html instead; Reveal.js can handle both HTML and Markdown together, seamlessly.
Fragments, background images, and more
As I’m building out my slide deck, I often find myself wanting more dynamic slides – a background image, different transitions, etc. Reveal.js has ways to define many of these behaviors, but using them with the Yeoman generator – especially with Markdown – is sometimes less than obvious.
A popular Reveal.js feature is “Fragments” – the ability to show/hide text after the initial display of the slide. This can be used to reveal new information as you present without overwhelming the audience with a wall of text up-front. In regular markup, we accomplish this by adding the class of fragment to an element:
|
1 2 3 4 5 |
<ul> <li>This is here from the beginning</li> <li class="fragment">This will appear as you advance the slide</li> <li class="fragment">Then this will appear</li> </ul> |
When you’re writing this in Markdown, adding a class to an object isn’t so simple: after all, Markdown isn’t meant to be a full replacement for HTML:
|
1 2 3 |
* This is here from the beginning * This will appear as you advance the slide * Then this will appear |
To get around this, we can apply HTML comments using the .element selector:
|
1 2 3 |
* This is here from the beginning * This will appear as you advance the slide <!-- .element: class="fragment" --> * Then this will appear <!-- .element: class="fragment" --> |
Likewise, if we wanted to add additional information to the entire slide (for example, a background image), we can do so by using the .slide selector at the top of our slide file:
|
1 |
<!-- .slide: data-background-image="resources/my-background.jpg" --> |
Sure, we could simply write the list in HTML and avoid the comments, but I personally find it easier to formulate my thoughts in Markdown, then apply classnames like .fragment after the fact. HTML and Markdown are both simply ways to structure your content, so use whichever works best for you.
Publishing to GitHub pages
One of the reasons I’ve stuck with Reveal.js over the past few years has been how easy it is to publish my presentations to GitHub pages, giving me a URL that I can easily share without relying on services like SlideShare. The Reveal.js Yeoman generator makes this even easier: during the presentation’s initial generation (or by editing the Gruntfile.coffee file), users are able to specify the GitHub username and repository name that will host the presentation.

Once the presentation is ready to be shared, simply run grunt deploy to push the current master branch of your presentation to GitHub pages, available at http://{username}.github.io/{repository-name}, giving you an easily-sharable URL!
The importance of a README file
I’ve found that the repository README file can be a great way to provide background information about the slide deck, including links to additional resources (including relevant posts on your own blog, if you’re like me and tend to create talks around things you’ve already written). In general, my presentations’ README files tend to follow a common pattern:
- The presentation title (
<h1>element) - The presentation abstract: a paragraph or two summarizing what the presentation is about – this is the same abstract that I send to conference organizers when I submit the talk
- A call-to-action to “View Slides”: a link to the GitHub Pages version of the presentation
- Presentation History: a list of places this presentation has been given, including relevant Joind.in links. This can be immensely useful when submitting a repeat talk, as you can show the types of conferences who have already said “yes” to the talk and link to positive reviews the talk has received.
- Additional notes: this section isn’t always necessary, but it’s often helpful for both my audience and myself to keep track of good resources related to the topic.
Tagging releases
When presentations are being tracked under version control, it’s natural to want to apply other software development principles to them. For example, if I need to make modifications specific to a given conference, I tend to do this work in a branch. After I’ve given a talk, I create a new tag in the repository, marking a new “release” of the presentation.
Tracking slide views
One drawback to hosting your slides yourself via GitHub Pages is that, out of the box, there’s no way to track the number of people viewing your slides. Fear no more, for I released an npm package earlier this year that hooks into the Reveal.js API and sends custom events to Google Analytics. The package is available via npm, with its source available on GitHub.


Raul
Nice tutorial and nice tools!!
I am not a JS developer but i liked your tutorial so much that I just installed node.js, Yeoman and Grunt (and a few dependencies like bower).
I can create slides with “yo” but when I use the command “grunt” or “grunt serve” (btw, what is the difference?) I get nothing but a white page in my browser….
In my power shell (I use windows 10) I read: running “watch” task… waiting….
Do you have any idea of might be going on?
Thanks,
Raul
Steve
Hey Raul, thanks for the kind words!
To answer your first question, Grunt’s default task (e.g. “grunt”) runs the “test” and “serve” tasks (check the bottom of Gruntfile.coffee to see where this is defined) — basically, running “grunt” is the same as running “grunt test && grunt serve”.
With regards to the white screen, that’s indicative of an error in your JavaScript — I’d recommend checking the web inspector console within your browser. Running “grunt test” can also help diagnose syntax errors or other common issues that might be preventing the code from running properly.
Best of luck, and thanks again!